When selecting a paint color, it's important to consider versatility.
When it comes to decorating our homes, there's an array of options and styles to choose from. Among these, neutral colors stand out as a classic and versatile choice that never goes out of fashion. The allure of neutral tones lies in their ability to create a calming and sophisticated ambiance while seamlessly blending with any interior style.
There is no one most popular paint color among designers, but neutrals are widely used and complement a range of spaces and styles.
What is "neutral" color?
A neutral is a color without much intensity or saturation, which generally goes well with everything. Examples of neutral colors include beige, taupe, gray, cream, brown, black, and white. While neutral colors are not on the color wheel, they complement primary and secondary colors. Neutral color palettes create a sense of balance and harmony in a space, making them ideal for creating a relaxing environment.
For this reason neutrals are a great backdrop for pretty much any design choice. They’re a great starting point for any room because any space can just be updated often just by switching out accessories like pillows, throws and art. Bright, bold colors will pop against neutrals, and you really can go with any palette, warm or cool and use a desired color in smaller doses and create a room that looks colorful without the big commitment of painting the walls.

The Timeless Elegance of Neutrals
The use of neutral colors in home decor dates back centuries and has never lost its allure. By opting for a neutral backdrop, you can create a canvas that allows you to easily update your decor elements with minimal effort. This flexibility is particularly useful if you enjoy experimenting with different styles or if you like to refresh your living space frequently.
Benefits
Light and Airy Atmosphere: Neutral colors have the power to make a room feel more spacious and airy. This is especially beneficial for smaller rooms or spaces with limited natural light. Lighter neutrals reflect light, giving the illusion of openness and enhancing the overall ambiance.
Timelessness: Trends come and go, but neutral colors have stood the test of time. Opting for a neutral color scheme ensures that your decor will remain chic and stylish for years to come, saving you from constantly having to update your space with each new trend.
Tips for Incorporating Neutral Colors
Layering Textures: To prevent a neutral space from feeling flat or monotonous, play with different textures. Consider combining soft fabrics like linen, plush throws, and textured rugs with sleek surfaces like polished metal or stones to add depth and interest.
Pops of Color: While neutrals shine on their own, adding pops of color through decor accents can create a striking visual contrast. Opt for bold-hued pillows, artwork, or decorative accessories to inject personality and character into the room.
In conclusion, the timeless elegance of neutral colors in home decor offers a world of possibilities for creating a beautiful and inviting living space. The versatility, calming atmosphere, and enduring appeal of neutrals make them a popular choice for both novice decorators and design enthusiasts alike. By leveraging the power of neutral palettes, you can transform your home into a stylish sanctuary that stands the test of time.
So, embrace the soothing charm of neutral colors and let your creativity flow in designing a space that is uniquely yours. Happy decorating!

When designing this living room, we used Silver Satin from Benjamin Moore on the walls and a beige sofa from Camerich, which we love because of the versatility of having tailored slipcovers. We added texture with different pillows and the beautiful rug. What about that very dramatic branch?!
Colorful living room designed by Soledad Alzaga Interior Design - Photo credit Soledad Alzaga
This space has a lot of color but the walls are a neutral white. The sofa is also a neutral color, and it's the perfect backdrop for all the rich colors I used with pillows and accessories. I love the contrast of a strong, heavy coffee table and a simple textured sisal rug. I used Simply White from Benjamin Moore on the walls. It's my favorite white paint color because it's warm, but crisp with no blue undertones.

LA based designer Brigette Romanek uses neutral paint, sofa and rug and you can see how the space comes to life with bright use of color in those cool chairs and secondary rug.
All colors go with neutrals; even other neutrals. A darker neutral works particularly well in a room with lots of natural light, but also makes small spaces feel cozy, like powder rooms or a small office.
So what’s your favorite neutral? How have you used neutral shades in your own space?
xxx, Soledad
Soledad Alzaga Interior Design has been names Top 15 Best Design Companies in San Francisco
When it comes to transforming a space that is boring and flat, adding character and depth to walls with molding is the perfect choice. It’s an easy way to add personality and highlight specific areas throughout your home.
Of course not every design style works - modern, minimalistic and mediterranean styles not so much. But today we are talking about spaces that look better with the addition of molding and in this blog post, I will talk about various types of molding and show you some pictures with beautiful use of it.
Wall molding, also known as trim, refers to decorative and functional elements used to enhance the appearance of walls in interior spaces. Molding is typically made of wood, although it can also be made from other materials like plastic or foam. It is installed along the edges of walls and ceilings, adding character, elegance, and definition to a room.

Here are some common types of wall molding:
1. Crown Molding: Crown molding is installed where the walls meet the ceiling, softening the transition between the two surfaces. It often has intricate designs and adds a touch of sophistication to a room.
2. Baseboard Molding: Baseboard molding is placed at the bottom of walls, where they meet the floor. Its purpose is both aesthetic and practical, as it protects the wall from damage and covers the joint between the wall and the floor.
3. Chair Rail Molding: Chair rail molding is installed horizontally on walls, usually at a height of about 30 inches from the floor. It was traditionally used to protect walls from damage caused by chairs but is now more commonly used for decorative purposes.
4. Picture Rail Molding: Picture rail molding is installed near the top of walls, and it serves as a practical way to hang pictures or artwork without the need for nails or hooks directly in the wall.
5. Wainscoting: Wainscoting involves using decorative panels (usually wood) on the lower portion of a wall, often accompanied by a chair rail above it. This technique adds elegance and interest to a room's design.
6. Panel Molding: Panel molding is used to create decorative panels on walls. It can be arranged in various configurations to achieve different looks, such as raised or recessed panels.
7. Beadboard: Beadboard is a type of paneling with narrow vertical planks that have a beaded design. It is often used to give a room a more rustic or cottage-style appearance.

Wall molding can be painted or stained to match the room's decor, and it comes in many different styles and sizes to fit different architectural preferences. The installation process may involve cutting, mitering, and nailing the molding to the wall, patching and painting or staining and it is often done by skilled carpenters or experienced DIY enthusiasts. Definitely not something I would try to tackle myself! Molding only looks great when it's done properly and there are some rules of proportion, but I won't get into that because I don't know enough and it would be an even longer post. If you are interested there is an article you can click on HERE and read more.
Make sure the style of the millwork selected matches the architecture and aesthetic of your home. One thing is important - make sure when installing, your home is consistent throughout. The baseboard, crown, and casing should all feel cohesive and proportionate.


Conclusion
Adding character to walls with molding is a great way to transform basic spaces into beautiful interesting ones. I definitely have a soft spot for this spaces I chose to show in these pictures. I like how this spaces look solid, well constructed and with history.
Soledad Alzaga Interior Design
An open concept kitchen is a modern architectural and interior design approach that involves combining the kitchen, dining area, and often the living room into a single, open and visually connected space. This design trend has gained popularity in recent years for its ability to create a more spacious, inviting, and interactive environment within a home. In a traditional home layout, kitchens are usually separated from other living spaces by walls and partitions. In an open concept kitchen, these barriers are removed, allowing for a seamless flow of space and natural light. But does it work for everyone?
Lately there has been a lot of talk against open concept kitchens. Some people are realizing they don't want to have their kitchen tidy at all times or they want to be able to close a door and leave the mess behind while hosting a party or thanksgiving dinner.

I was recently watching an episode of real Housewives of New York City (yeah, I know, I'm not ashamed to say I watch that show!) and they were having a catered dinner party and the caterers where cooking and serving while the ladies where sitting down to dinner. All in the same space. The conversation got emotional and it was just awkward to watch the characters crying having a deep conversation and the caterers standing around like they were not listening.
It's important to consider your lifestyle, family dynamics, and personal preferences when deciding whether an open concept kitchen is right for your home. While it offers numerous advantages, it's essential to address any potential challenges and find ways to mitigate them through thoughtful design and layout decisions.
Some key features and benefits of an open concept kitchen:

How to best design your open plan kitchen:

While there are many benefits to open concept kitchens, they can present challenges related to noise, privacy, and cooking odors. Without walls, noise from the kitchen can easily carry to other areas, and cooking smell can spread throughout the living space. Designing an open concept kitchen requires a thoughtful approach to balance aesthetics, functionality, and practicality.
Soledad Alzaga Interior Design is a San Francisco interior design firm specializing in home remodels and decorating. Named top 15 Best Interior Design companies, we design custom kitchens and homes through out the Bay Area, Napa, Healdsburg, Atherton, and worldwide.

Pastels: Soft pastel shades like pale blue, mint green, lavender, and blush pink can be used to add a touch of color without overwhelming the space.
Warm and Cool Neutrals: Mix warm and cool neutrals to create balance. Warm neutrals include shades like taupe, warm grays, and camel, while cool neutrals consist of cooler grays and icy blues.

Monochromatic Schemes: Stick to a monochromatic color scheme by using varying shades of a single color. This can create a harmonious and soothing environment.
Bold Accents: If you want to add some vibrancy, consider using bold, gender-neutral accent colors like deep teal, mustard yellow, or charcoal gray.

Lighting: The type of lighting you use can also influence the perception of colors in a room. Warm lighting can make cooler colors appear cozier, while cool lighting can make warm colors feel more refreshing.
I'm sure some of you have heard or read the phrase:
"IF YOU THINK IT'S EXPENSIVE TO HIRE A PROFESSIONAL, WAIT TILL YOU HIRE AN AMATEUR"
The quote is from Red Adair, an American oil well firefighter who was an expert in his field and set his price accordingly. He understood that his knowledge and experience had an inherent value that would actually save someone money if they would allow him to do the job right the first time.
I am sure that everyone has a story that relates, and I believe this concept pretty much applies to everything. After all you wouldn't hire an amateur surgeon, lawyer or tattoo artist!
Are you considering a home renovation or revamping your living or working space? Do you have an aunt, mother in law or her friend who likes decorating, has good taste and wants to help you? I'm sure they have the best intentions, you think it's worth a shot, but are they really experts in what they are doing?
![]()
Of course I will tell you why hiring and working with an interior designer, especially Soledad Alzaga Interior Design, can be a smart move.
Let's explore why an interior designer is a valuable investment:
Interior designers who have been doing their job for years, have already learned from mistakes, unexpected circumstances and can foresee posible issues so that projects run smoothly.
By hiring Soledad Alzaga Interior Design, you gain access to unparalleled interior design expertise, ensuring that your home or commercial project has a curated, thoughtful design. Our passion lies in discovering inspiring spaces and building relationships with clients who trust us to work our magic!
A bathroom remodel can be an exciting and rewarding project, but it can also be a bit overwhelming if you're not sure what to expect. It's always a good investment to update or remodel a bathroom, even add one in your home. You can do a full remodel, or just redesign and update yours by changing some things like paint, the vanity and faucets or light fixtures without changing the location of things or opening walls.
It's important to note that bathroom remodels can vary in complexity and scope. Always work with a designer, with experienced contractors and professionals, and be prepared for unexpected issues that may arise during the remodel. A well-planned and well-executed bathroom remodel can add value to your home and improve your daily life.
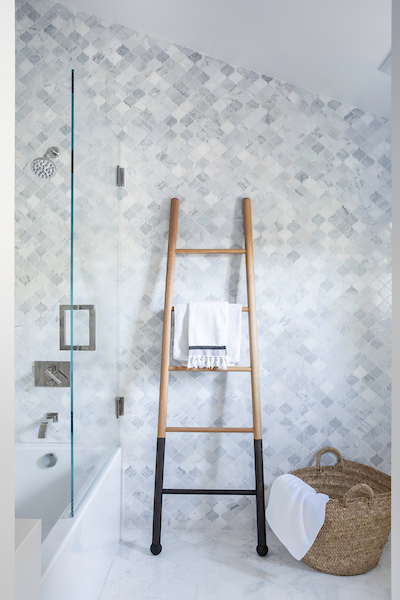
Here's a general overview of what you can expect during a bathroom remodel. At Soledad Alzaga Interior Design we have worked in many bathroom remodels and upgrades and know that some clients don't know what to expect. They look at pictures of finished bathrooms and have an idea of what they want theirs to look like, but might not know all the different steps needed to achieve them. So I will do a full breakdown of the different steps.
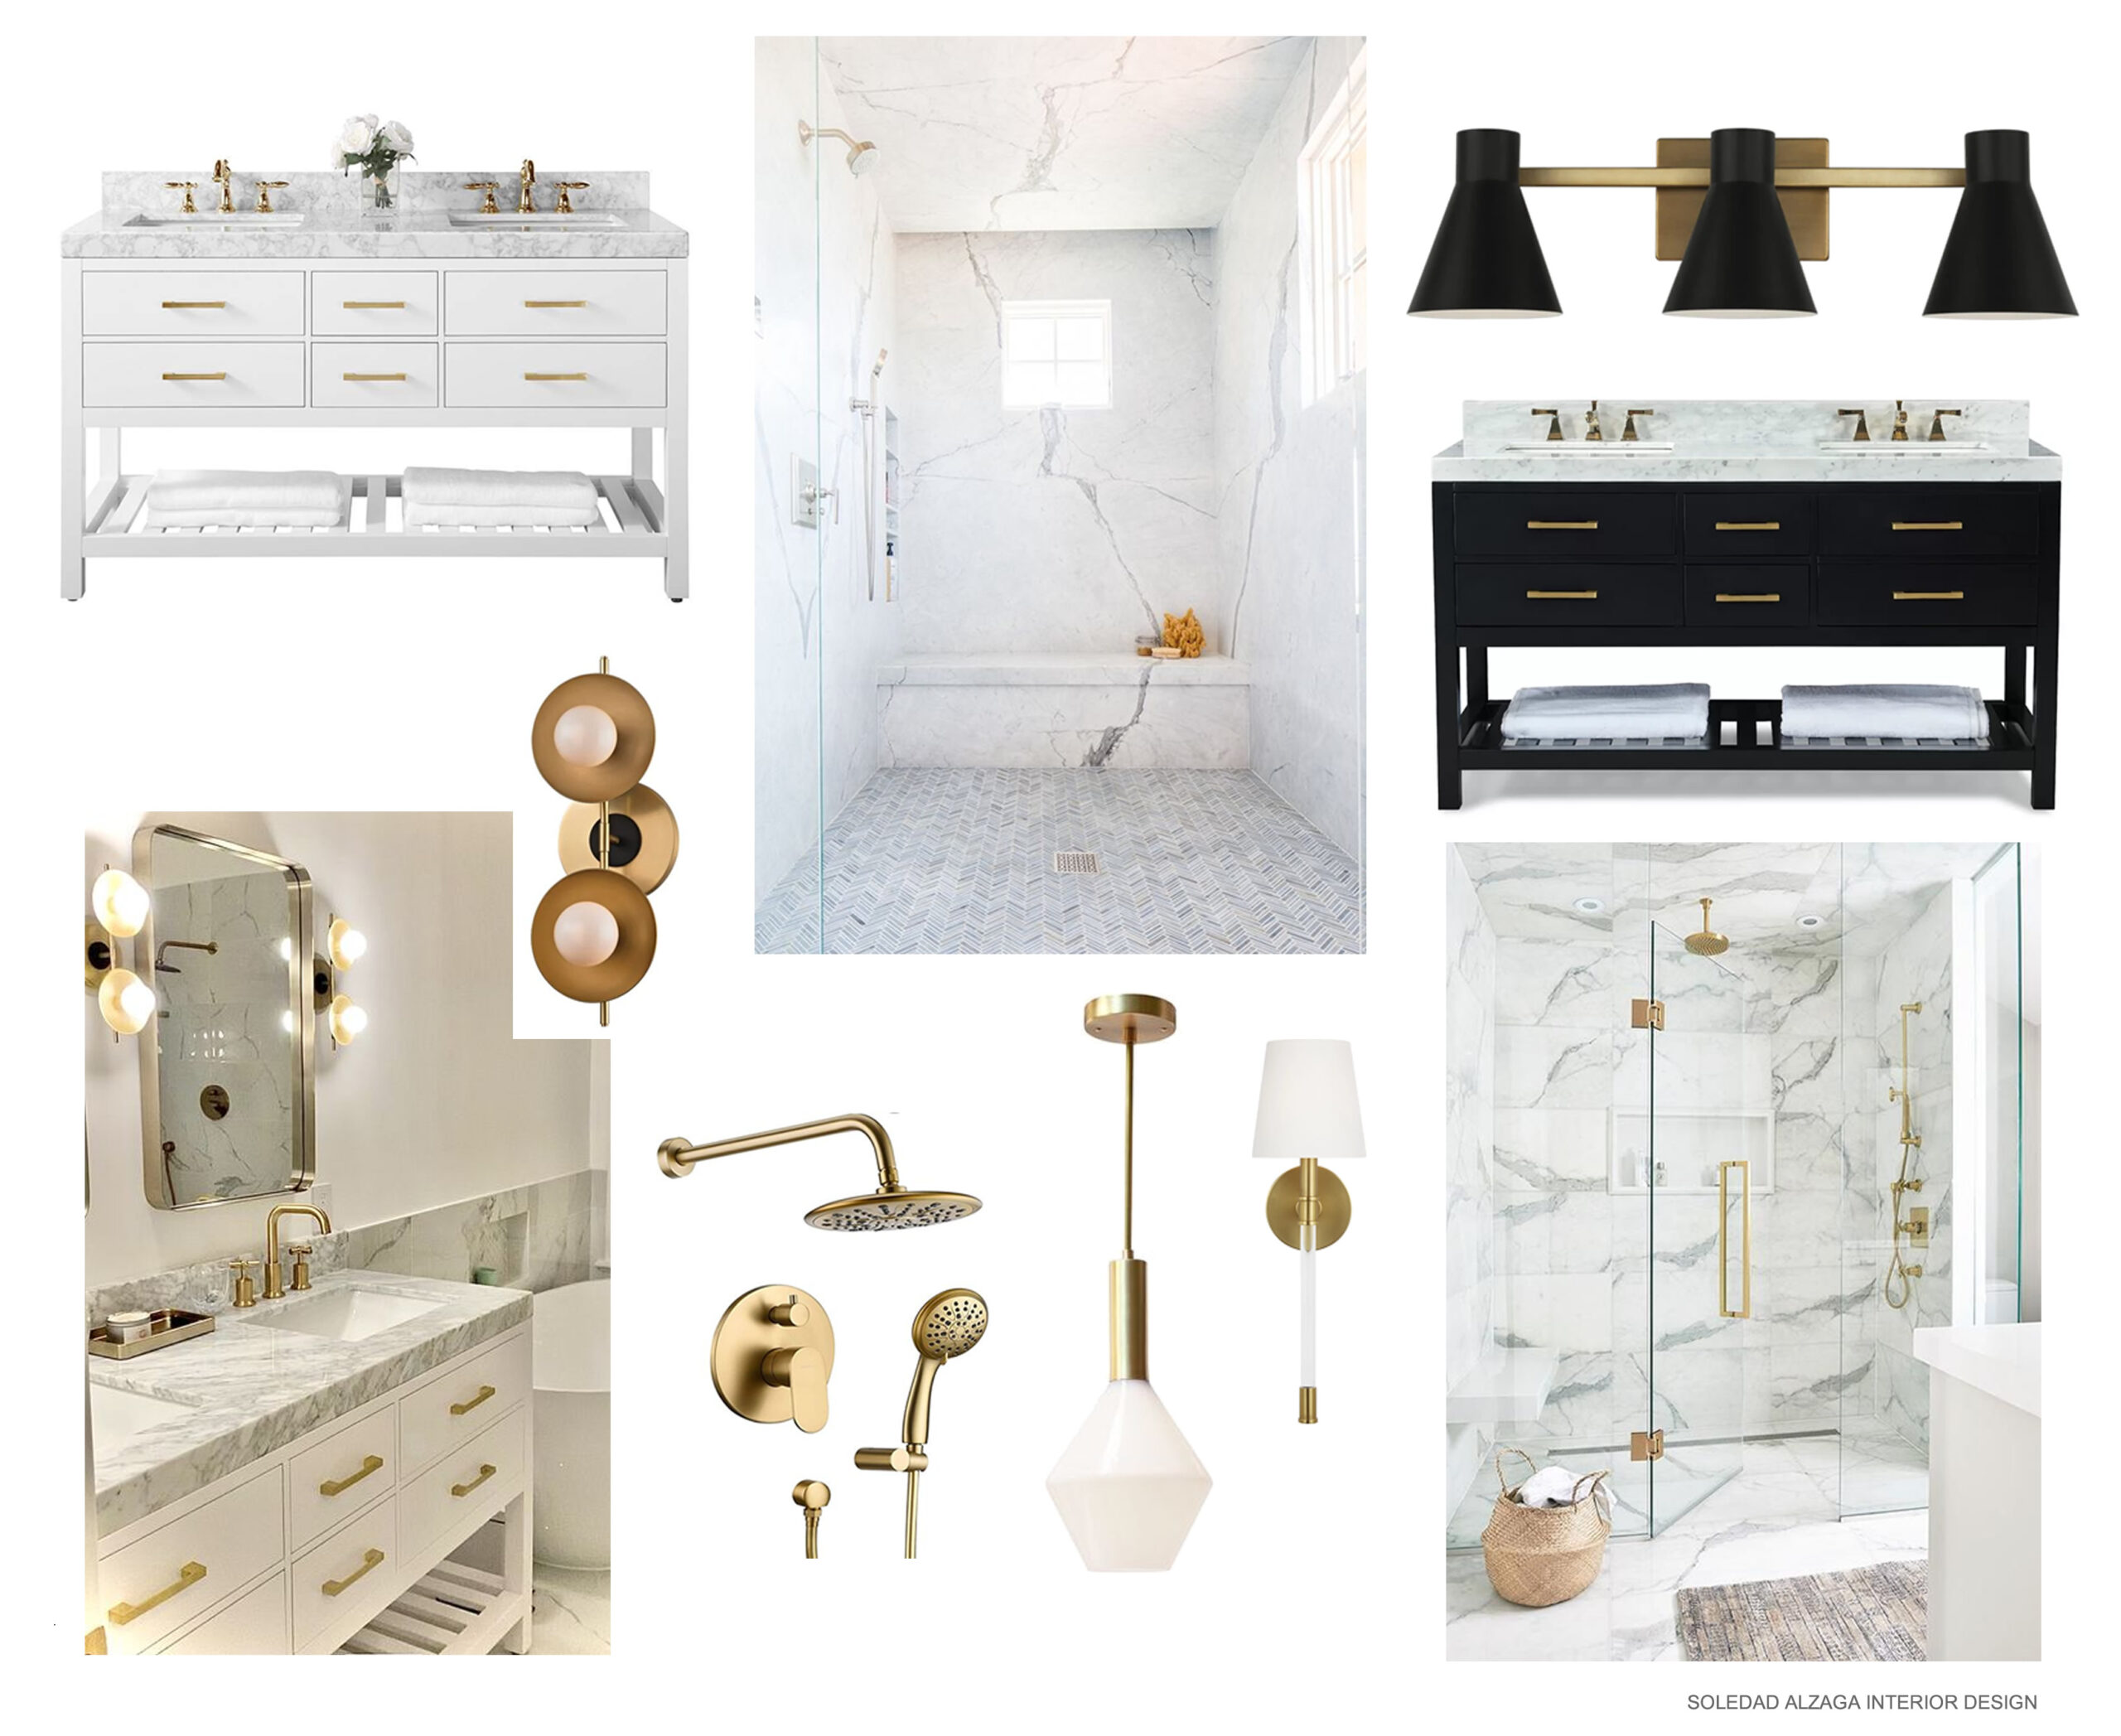
1- Planning and Design
Determine your budget: Decide how much you're willing to spend on your bathroom remodel. This will influence the scope of the project and materials we will choose.
Create a design: Work with a designer to plan the layout, choose fixtures, tiles, colors, and overall style.
Get a good contractor: your designer can help you with this, or ask friends or interview and ask references of contractors who work in your area and are familiar with your city codes.
Obtain permits: Your contractor can do this, or as a home owner you can get them yourself. Depending on your local regulations, you will need permits for certain aspects of the remodel, such as plumbing and electrical work.
Once you have things designed, a contractor chosen and your permits, we always like to order everything keeping in mind the timeline of things and make sure it all fits within the schedule with the contractor. We try to have most of the material on site, or at least know they are arriving in time for when we need them installed. Nobody wants to have to stop mid project because you are waiting for tile to arrive. It messes with the contractor and sub-contractors schedule and it can be costly in time and money.
2- Demolition
First part of the project starts with the demo, but before starting you should make sure the rest of your house is protected. If you are doing the full house then there is no need to protect things from getting dusty or damaged, but if you are only updating a bathroom, then the rest of the surfaces, floors, lights, etc should be protected from getting damaged and dusty. And trust me you don't want to spend hours removing construction dust from a chandelier!
What is demolition? It's when the contractor tears out existing fixtures, tiles, and flooring to make way for the new design. In these phase we address any structural issues, plumbing or electrical problems that may be behind the walls.
3-Plumbing and Electrical
If you have an old house or condo things will have to be brought up to code. We will have to update or relocate plumbing and electrical systems as needed to accommodate the new layout, meet updated codes, etc.
This will include installing new pipes, wiring, and fixtures, such as sinks, toilets, showers, and lighting.
Ensure proper ventilation with a fan to prevent moisture buildup. Nowadays fans are required by code, and that is something that will be done in this phase and later finished when they instal lights.
4-Framing and Drywall
Make any necessary changes to the room's framing to accommodate the new layout. Install new drywall or repair existing walls and ceilings.
5-Flooring
Lay the new flooring material, such as tile, vinyl, or hardwood, according to your design plan. If you want a heated floor, we plan that ahead of time because it requires a separate electrical line and a thermostat. In my experience, this choice doesn't add a lot to the cost of the remodel but makes a huge difference to your comfort.
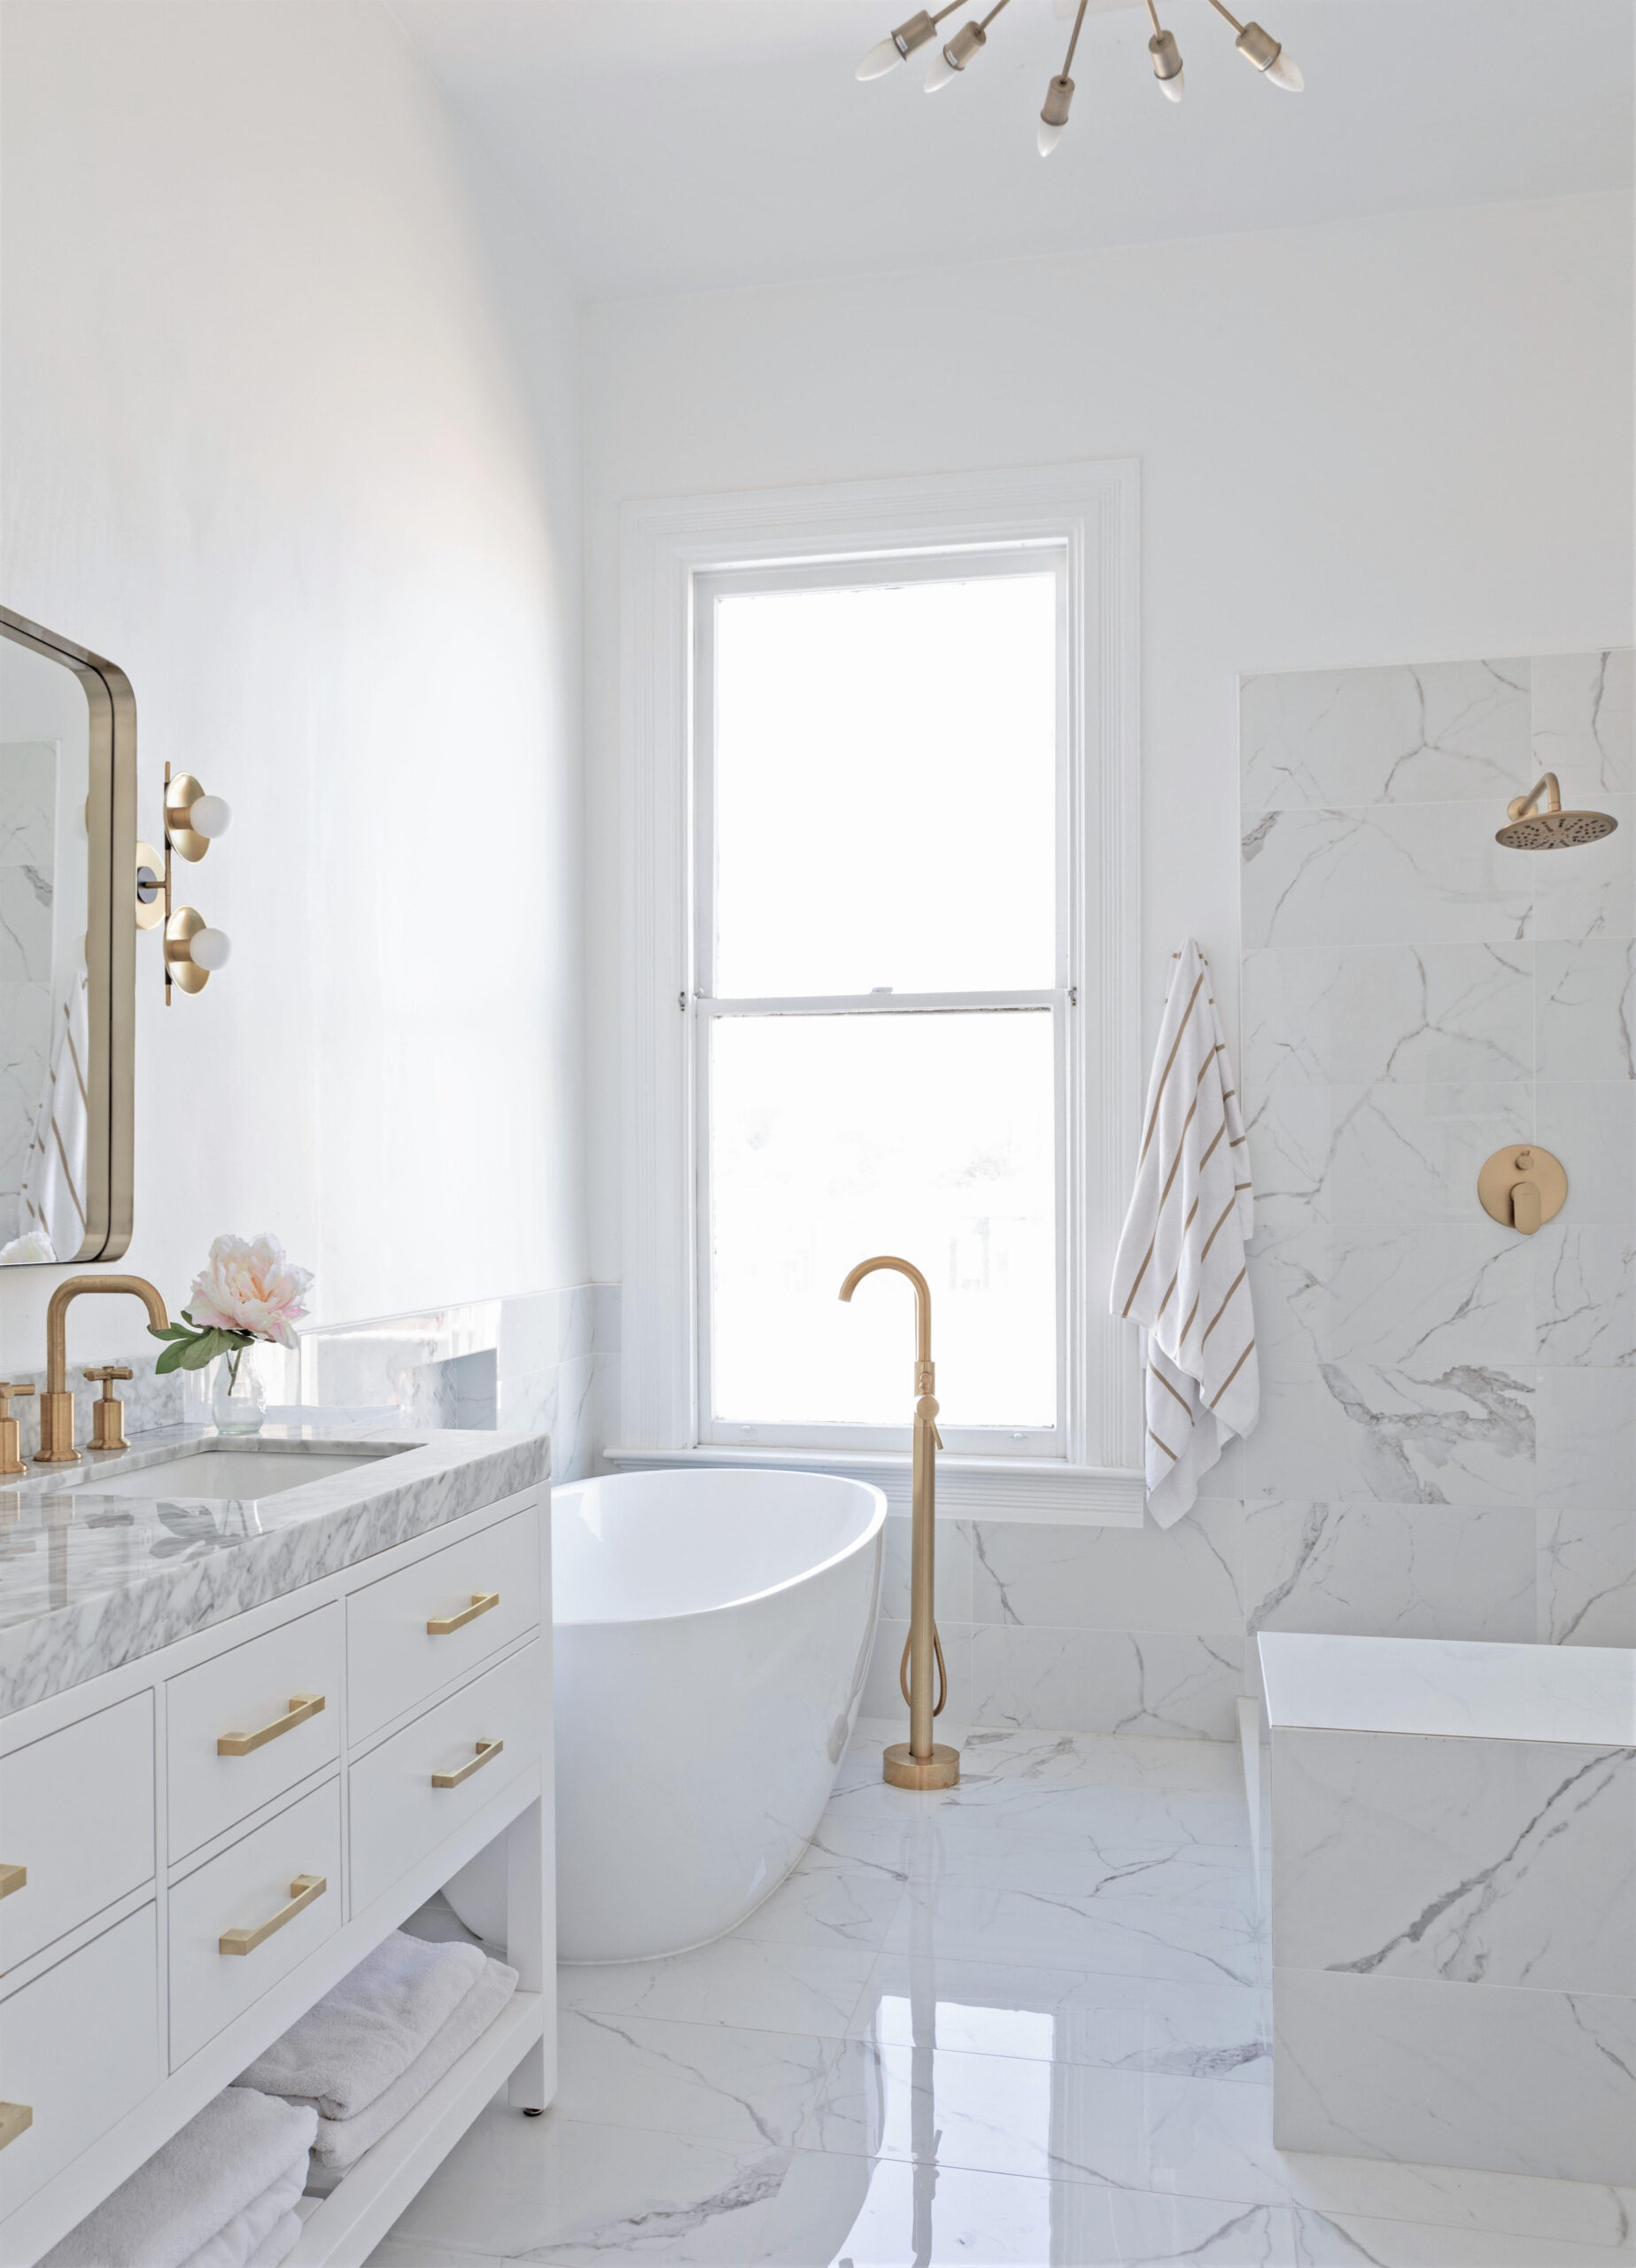
6-Tiling and Wall Finishes
Install the chosen tiles for walls and shower/tub surrounds. Make sure if you are using natural stone, to have the tiler seal it after they are done installing it. Your designer will help choose the grout color and texture that best work with your tile.
Finish walls with paint or other wall coverings.
7-Cabinetry and Fixtures
Install bathroom cabinets, countertops, sinks, faucets, and other fixtures.
Hang mirrors, towel bars, and other accessories.
8-Lighting and Ventilation
Install lighting fixtures, including overhead lights, vanity lights, and any other decorative lighting. the vent cover and finishes are installed in this phase too.
9-Final Touches
Install shower doors or curtains. Install window coverings if needed.
Test all fixtures and systems to ensure they are working correctly.
Clean the entire bathroom thoroughly.
Through out the project there will be inspections done by the city to make sure everything is incompliance with local building codes. The contractor handles that part and schedules inspections, with one last and final inspection where they sign off.
10-Final Walkthrough
Review the completed project with your contractor or designer to make sure all your expectations have been met.
It's common for unexpected issues or delays to arise, so it's a good idea to be prepared for some flexibility in your project timeline and budget. Working with experienced professionals can help ensure a smoother remodeling process.
Soledad Alzaga Interior Design was named top 15 Best Interior Design companies in San Francisco.
This standalone new construction office, which can also serve as a guest house, features a small kitchen and bathroom. Soledad Alzaga Interior Design was commissioned to project manage, decorate, and landscape the surrounding areas of this space in Healdsburg, California.
San Francisco, California
info@soledadalzaga.com
415-205-4680
